Public DNS offers an alternative to the server provided by your ISP, and switching can improve speed, reliability, privacy and security. We cover the main providers like Google, Cloudflare, OpenDNS and Quad9, along with simple instructions for changing your settings.
Here’s an 10-second fix that could significantly improve your Internet connection.
Every time you visit a website, your device has to use a DNS server to look up the IP address
You may be using a default DNS server, but alternatives could offer improved reliability, faster responses, greater privacy, and blocking of harmful websites
Switching is simple, but can break things if you use internal services, custom DNS or any sort of filtering. If you’re not sure, check with someone. We recommend that only users who are proficient with configuring operating system settings make these changes.
You can change the settings manually on each device, but it’s easier and more reliable to update it on your router, so every device picks it up automatically.
In our video we highlight four of the most common services, but they all offer slightly different feature sets. In no particular order:

Google prides itself on being neutral, but logs detailed DNS enquiries for 24-48 hours, then later anonymises them to improve their service. Google is based in America and subject to their privacy and data laws.
Google’s DNS settings are:
| Ver. | Address |
|---|---|
| IPv4 | 8.8.8.8 |
| IPv4 | 8.8.4.4 |
| IPv6 | 2001:4860:4860::8888 |
| IPv6 | 2001:4860:4860::8844 |

Cloudflare stores anonymised logs for up to 25 hours and is widely regarded as one of the fastest public DNS providers, often outperforming Google and OpenDNS. It offers optional malware blocking, but doesn’t support custom filtering or detailed controls. Cloudflare is based in the United States and operates under US privacy and data laws.
Cloudflare have three options for DNS settings, depending on what features you want.
For standard DNS:
| Ver. | Address |
|---|---|
| IPv4 | 1.1.1.1 |
| IPv4 | 1.0.0.1 |
| IPv6 | 2606:4700:4700::1111 |
| IPv6 | 2606:4700:4700::1001 |
To block malware:
| Ver. | Address |
|---|---|
| IPv4 | 1.1.1.2 |
| IPv4 | 1.0.0.2 |
| IPv6 | 2606:4700:4700::1112 |
| IPv6 | 2606:4700:4700::1002 |
To block malware and adult content:
| Ver. | Address |
|---|---|
| IPv4 | 1.1.1.3 |
| IPv4 | 1.0.0.3 |
| IPv6 | 2606:4700:4700::1113 |
| IPv6 | 2606:4700:4700::1003 |

OpenDNS (owned by Cisco) offers public DNS servers that include built-in protection against malicious websites, even without an account. Creating a free account unlocks additional features like activity logs and custom filtering, with dozens of content categories that can be applied across your entire network. They offer both a free home plan and paid enterprise options. OpenDNS is based in the United States and operates under US privacy and data laws.
| Ver. | Address |
|---|---|
| IPv4 | 208.67.222.222 |
| IPv4 | 208.67.220.220 |
| IPv6 | 2620:119:35::35 |
| IPv6 | 2620:119:53::53 |

Quad9 are the most privacy focused of all, offfering completely free malicious-site filtering, but with no option to do custom filtering. Does not store ANY logs whatsoever. Is a non-profit based in Switzerland, and thus subject to their strict privacy laws.
Quad9’s DNS settings are:
| Ver. | Address |
|---|---|
| IPv4 | 9.9.9.9 |
| IPv4 | 149.112.112.112 |
| IPv6 | 2620:fe::fe |
| IPv6 | 2620:fe::9 |
For most networks, the simplest approach is to change the DNS settings on the router. The router then hands out those DNS servers to devices automatically using DHCP, so anything that connects to the network picks them up without needing to be configured individually.
However, every router has a different procedure for doing this, so providing detailed instructions is impossible. If you’re comfortable doing so, the process is generally to login to the router’s admin page (this may be written on the bottom of your router) or an app if you’re using a device such as Eero, then navigate to network settings/DNS, and change the values accordingly. The device will often need to reboot for settings to take effect, which will disconnect users temporarily from the network.
Devices may not update immediately. They often cache DNS settings or keep using their existing lease, so it can take a little time, or a reconnect/restart, before the new settings take effect.
There are times when you might want to change individual devices. Perhaps you want all the other devices on your network to use the defaults, but to override one or two.
This is fairly easy to do, provided the settings haven’t been locked down by a system administrator.
DNS settings are often changed on a per-network basis, and you may first need to be connected to WiFi or through a cable to the network you want to change. If you connect to the same network sometimes through Wifi and sometimes through a cable, you’ll usually have to change the settings for both (another reason to just change it on the router instead!)
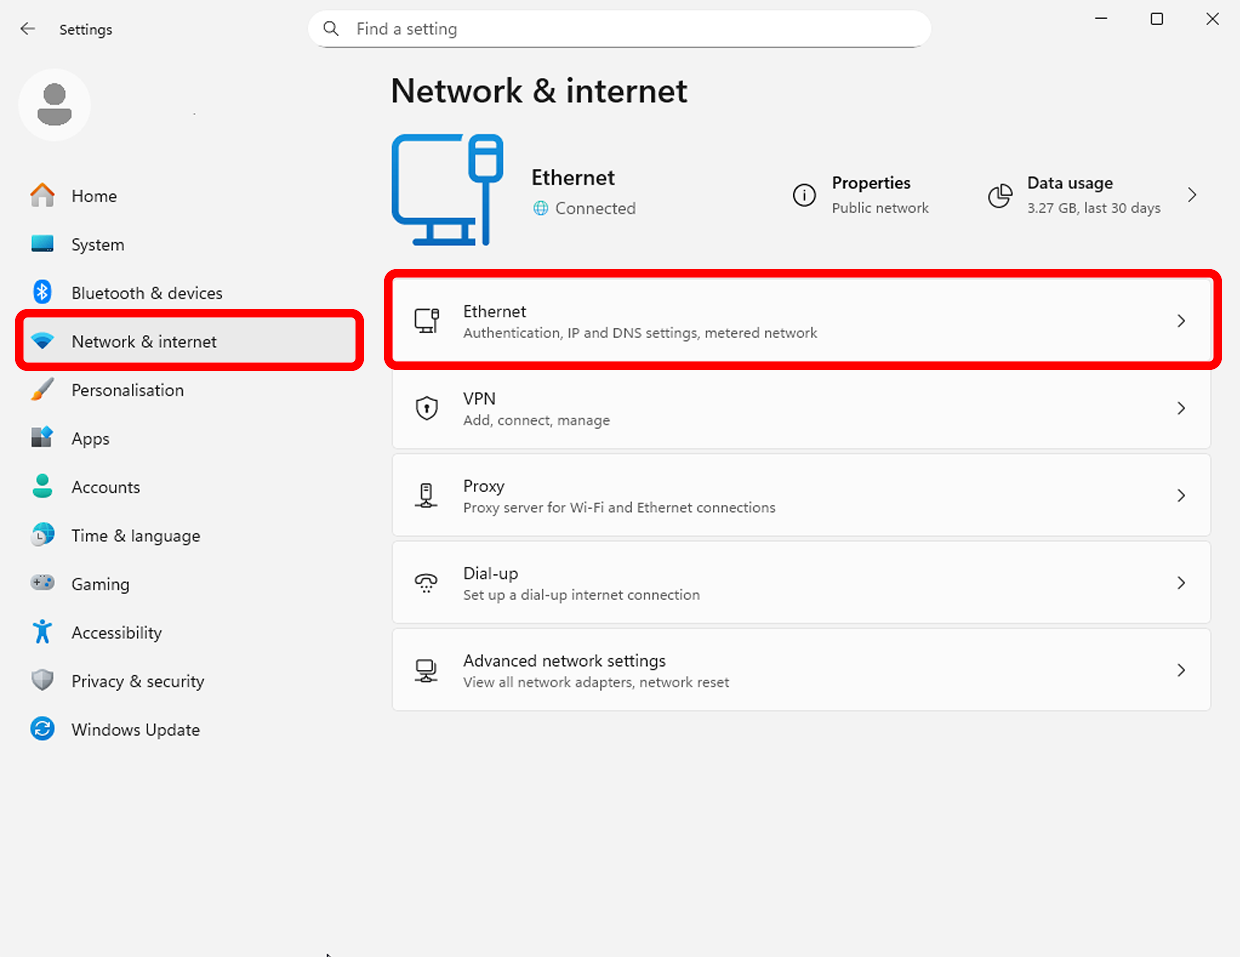
Go to Settings then Network & Internet, then click Wi-Fi or Ethernet (depending on your connection)
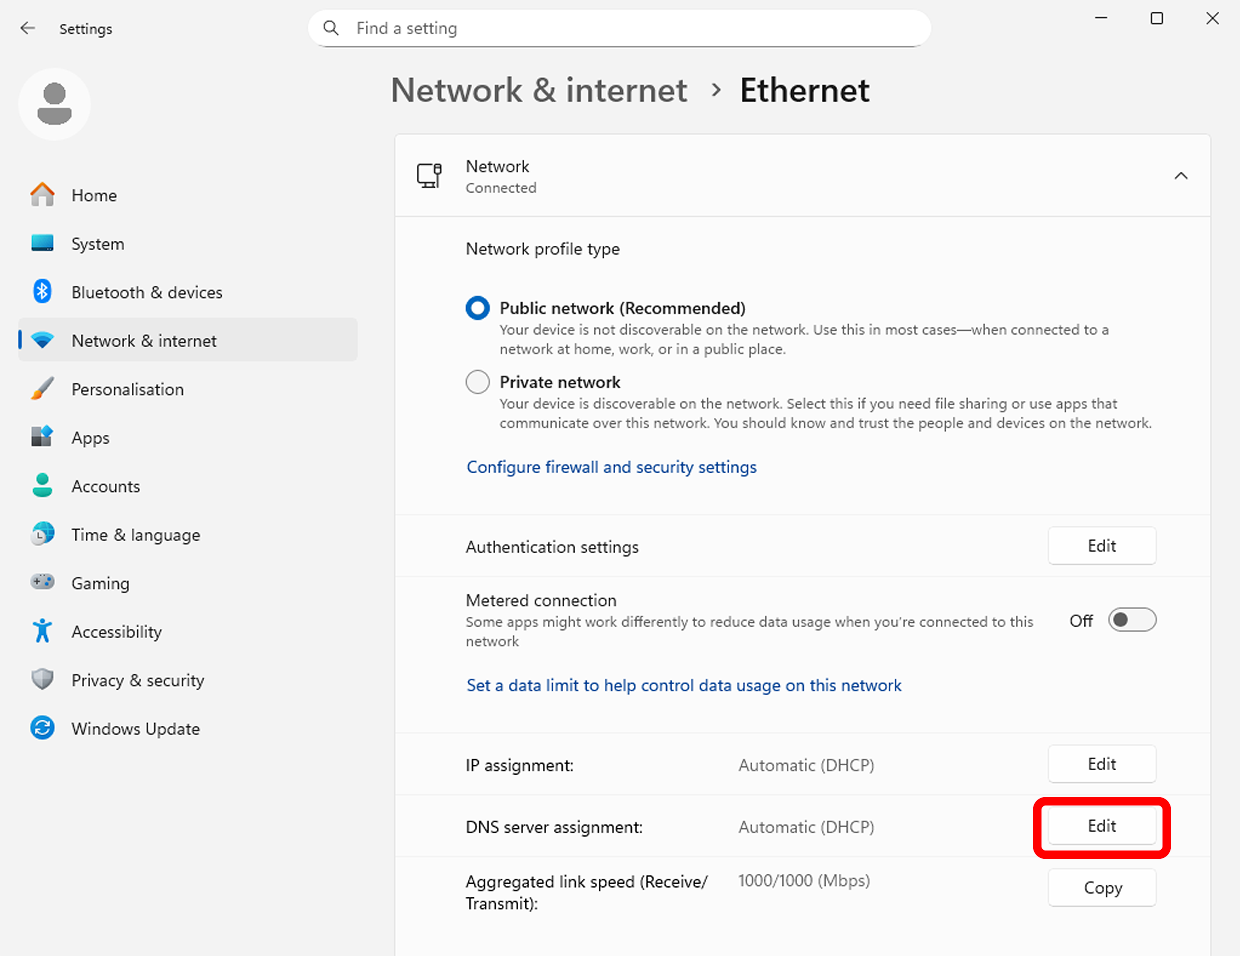
Next, scroll to DNS server assignment and click Edit.
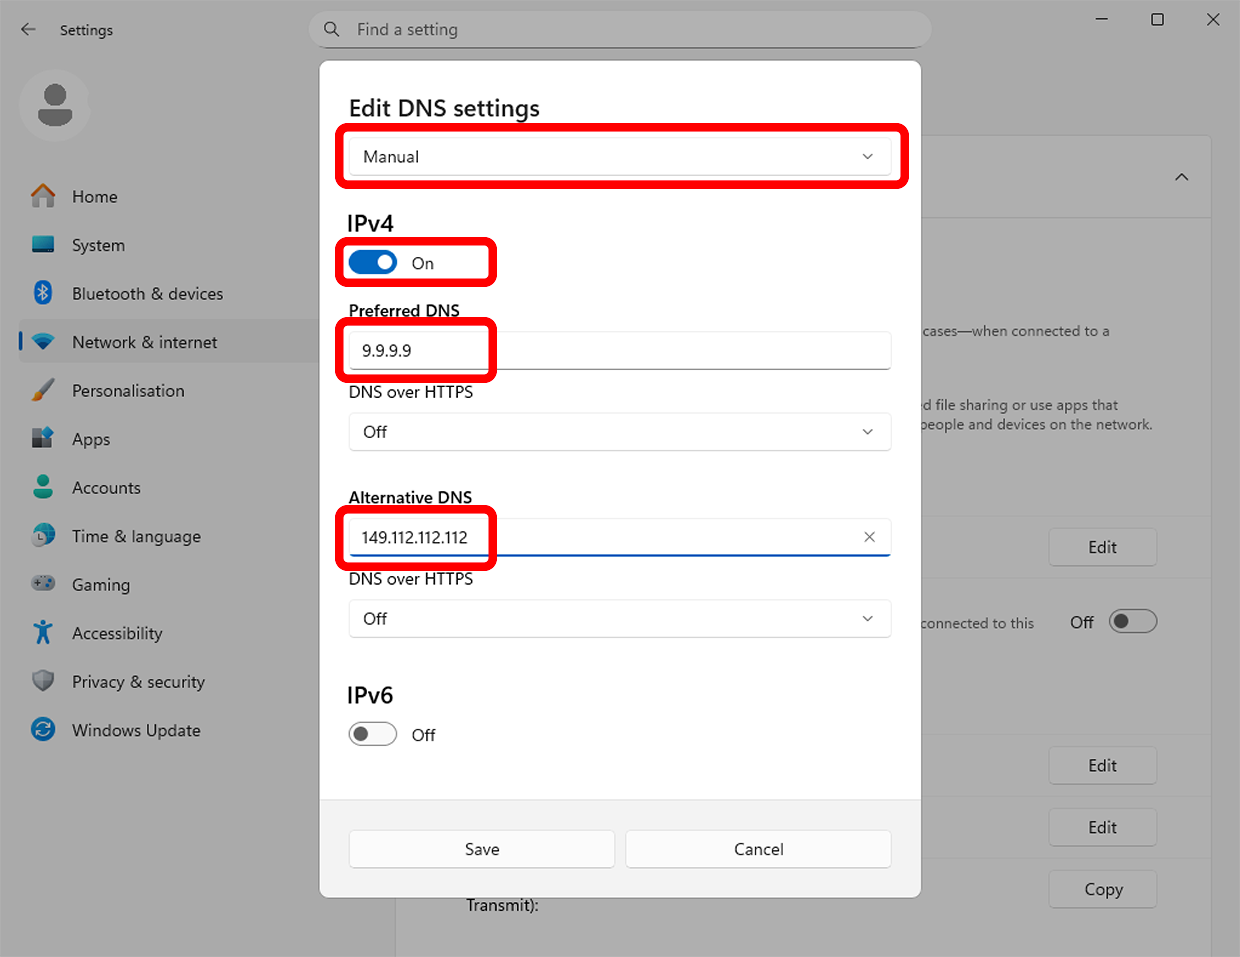
Change from Automatic (DHCP) → Manual. Turn on IPv4 (and/or IPv6 if needed) Enter your Preferred DNS and Alternative DNS servers, then click Save.
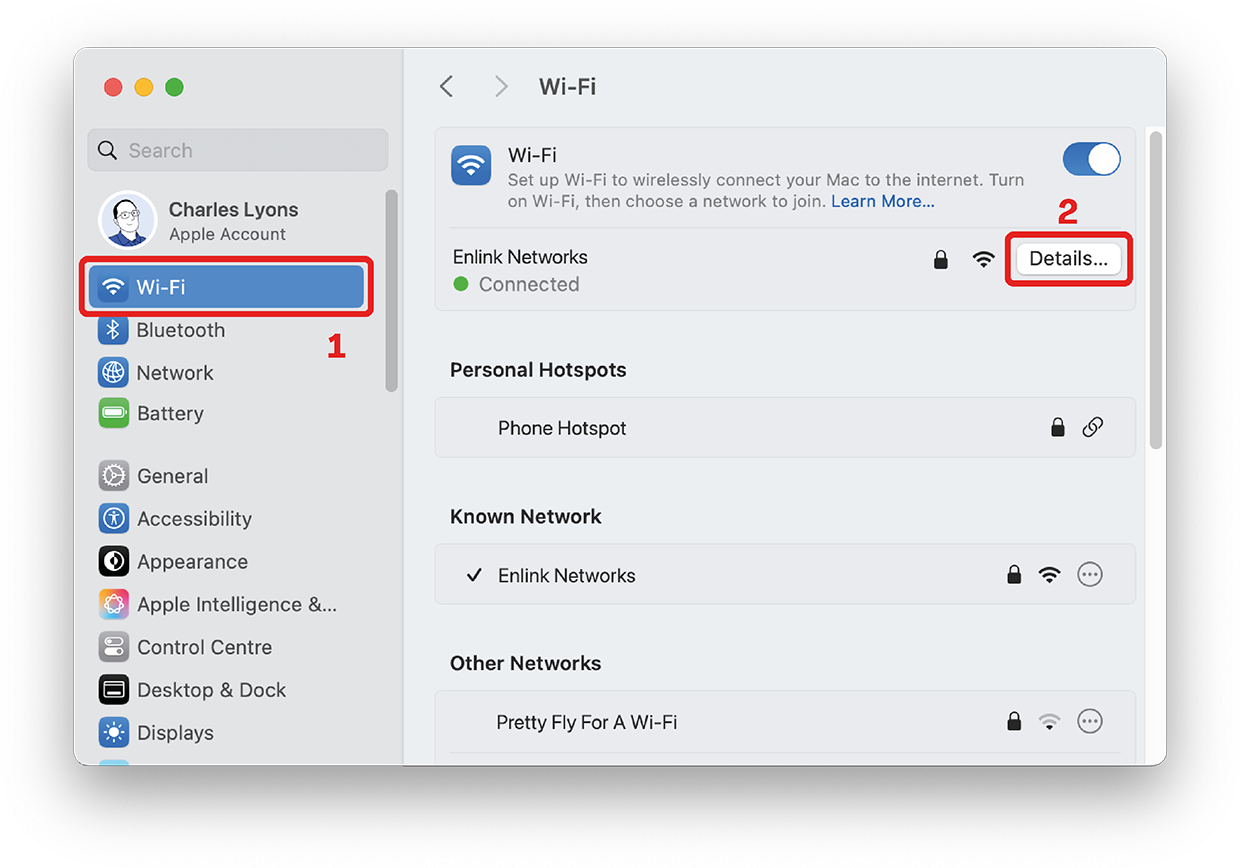
Go to System Settings, then Wi-Fi, and ensure you’re connected to the network you want to change and then click Details.
 Next, click DNS. It’s likely you have ISP-assigned numbers in there, which are greyed out. Click the + sign to add your own, then click OK when done.
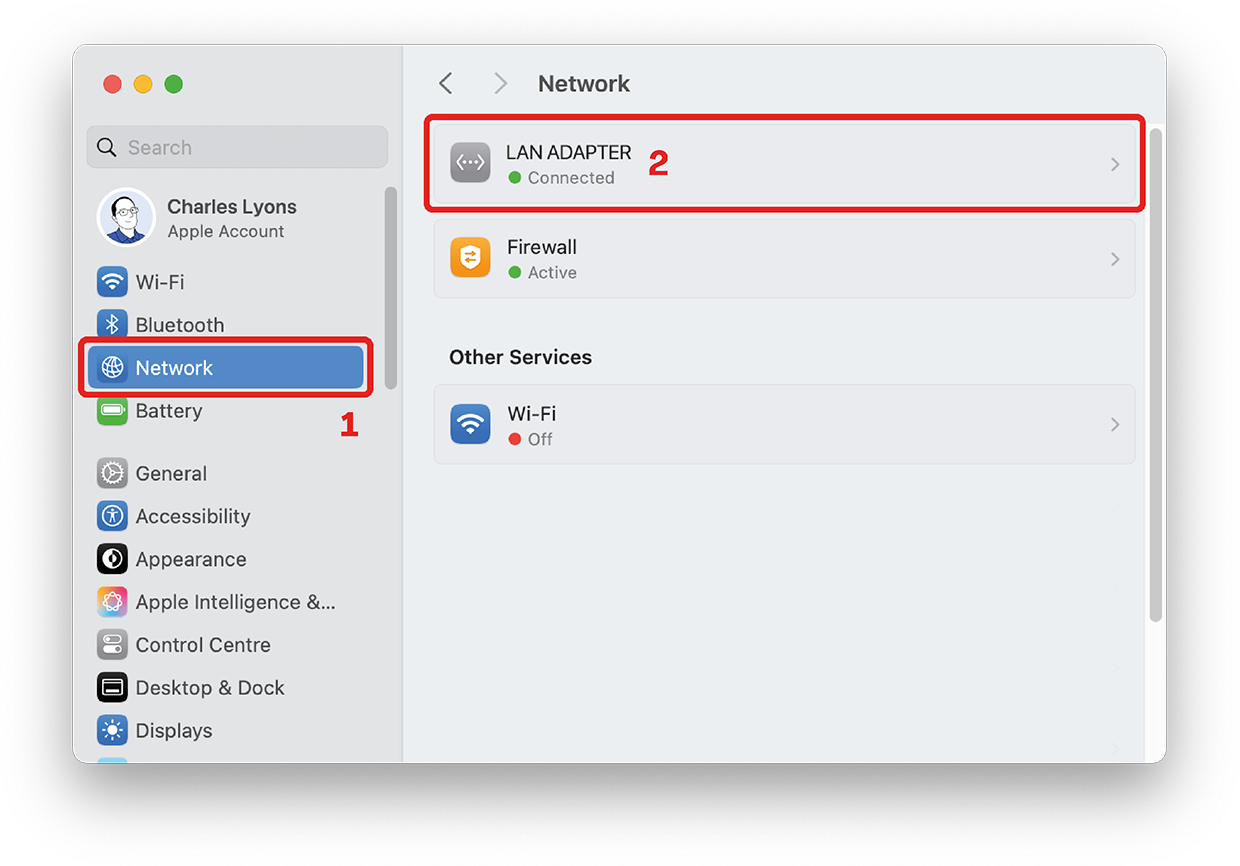
The process is similar for wired networks. Go to System Settings, then Network, then click on the connected network adapter.
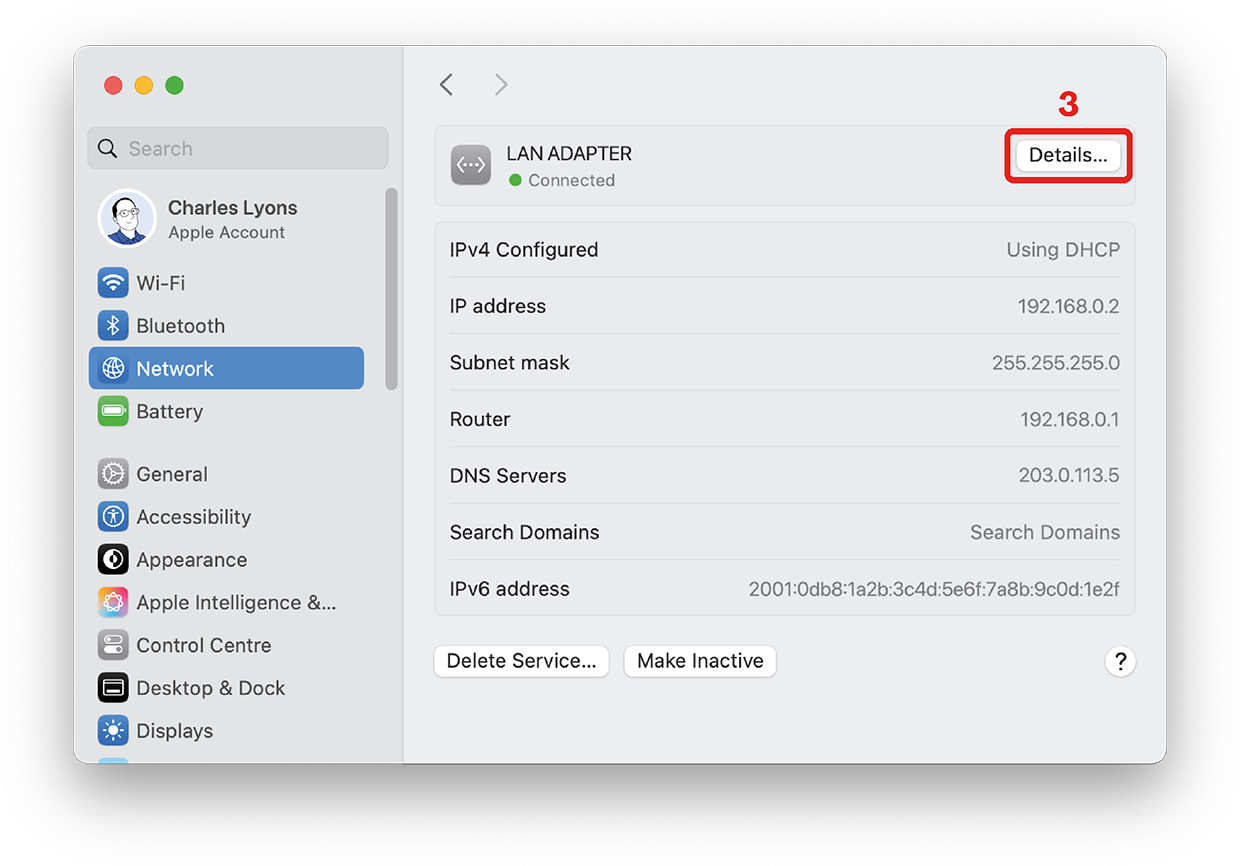
 Next, click Details
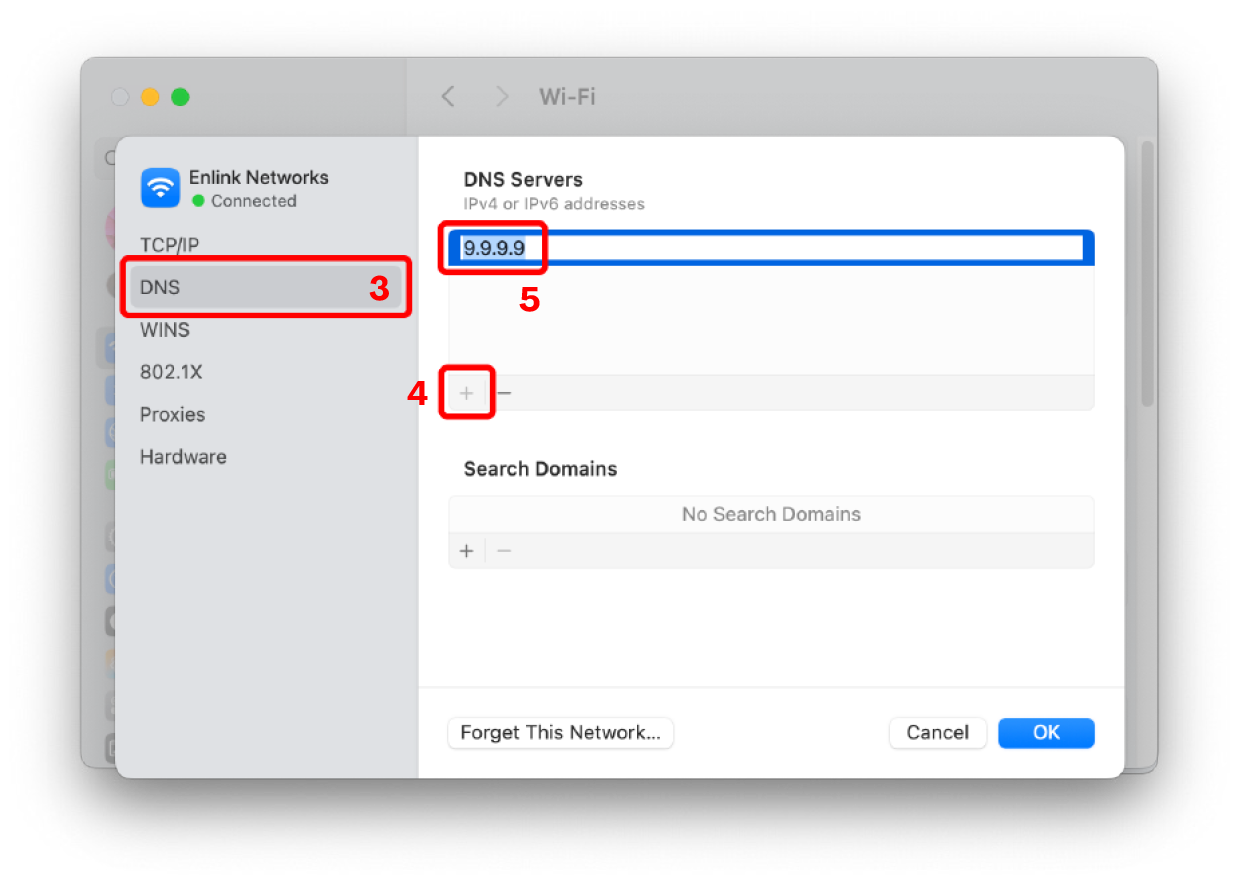
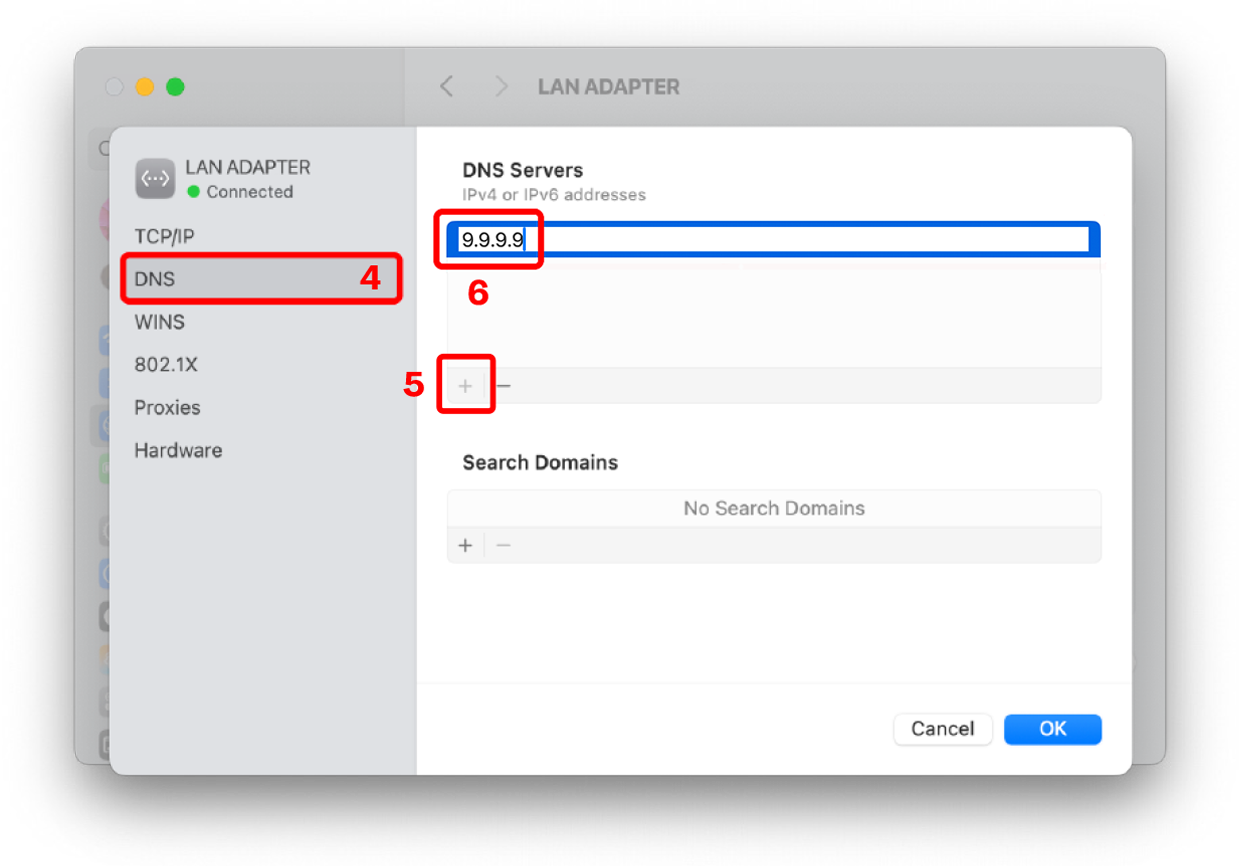
 Next, click DNS. It’s likely you have ISP-assigned numbers in there, which are greyed out. Click the **+**sign to add your own, then click OK when done.
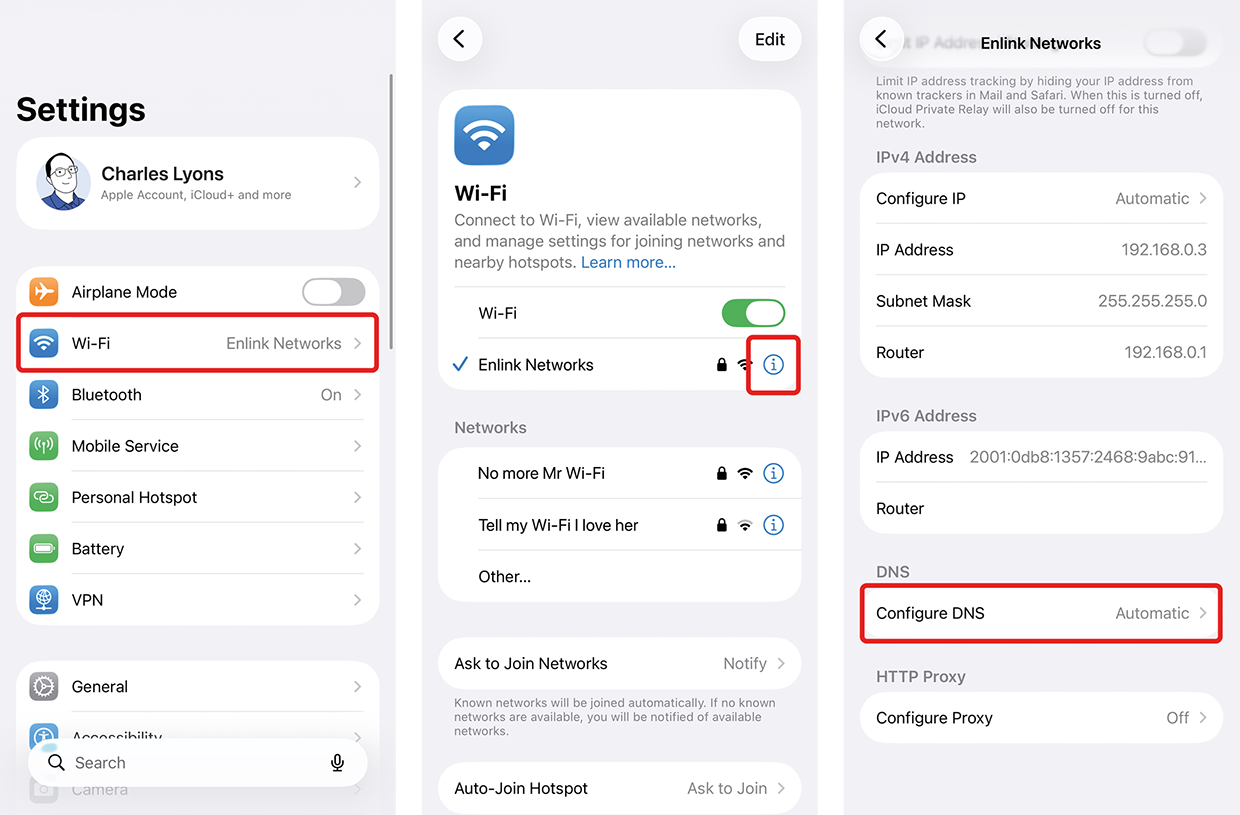
Go to Settings then Wi-Fi, then click the (i) icon on the network you’re connected to. Scroll down to DNS, and click on Configure DNS.
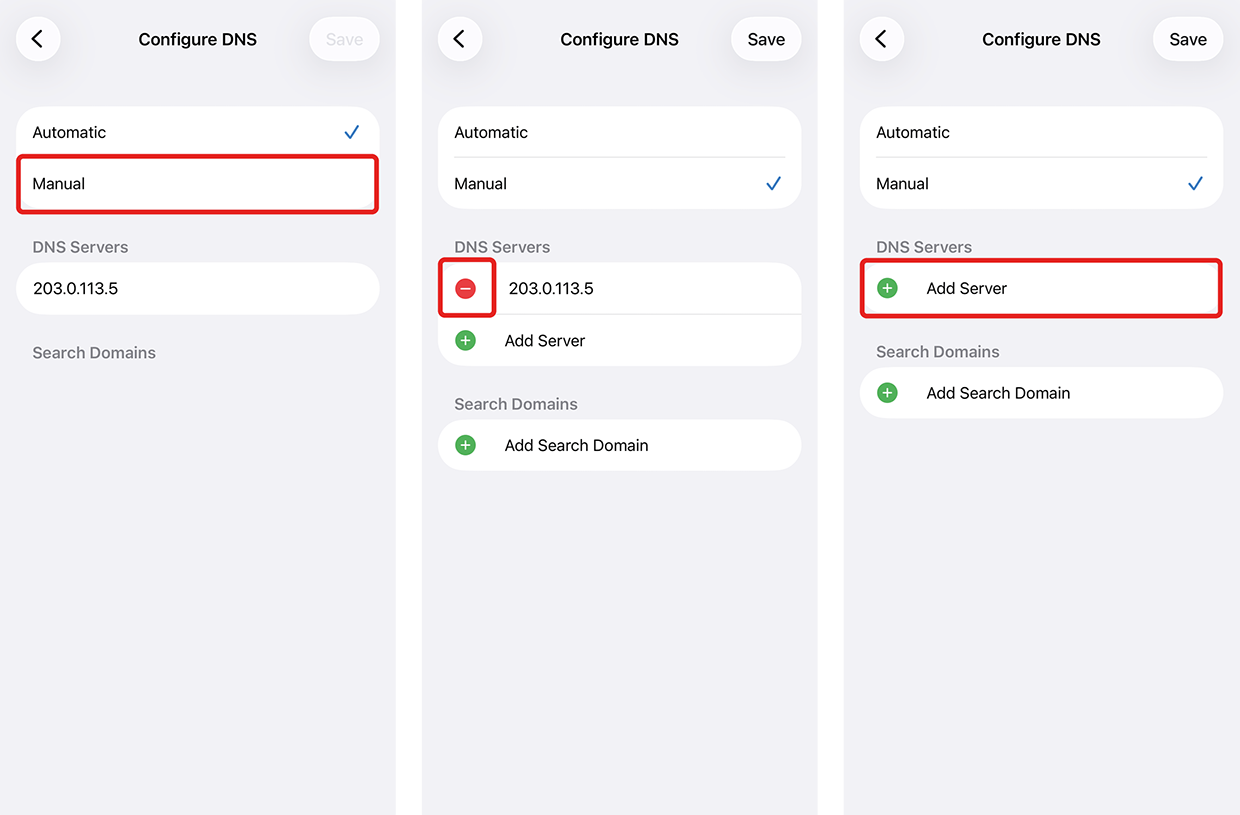
Change from Automatic to Manual, remove the existing DNS server, then click Add Server for each DNS required.
It is not practical to change DNS on Android, unless you wish you use fully encrypted DNS which you can do via the Private DNS settings which uses DNS-over-TLS. These require a hostname, rather than an IP.
| Provider | DNS Hostname |
|---|---|
| Cloudflare | 1dot1dot1dot1.cloudflare-dns.com |
| dns.google | |
| OpenDNS | dns.opendns.com |
| Quad9 | dns.quad9.net |

Running your own DNS resolver offers the greatest level of control and privacy, but it requires technical knowledge and ongoing management, so it’s not practical for most people. Public DNS services are a good alternative, but it’s worth remembering that any DNS provider can see the domains you look up, so trust and transparency matter.
Many popular DNS providers are operated by large US-based companies, which means they are subject to US data laws and policies, particularly the CLOUD Act, which allows US authorities to access data stored in the EU, putting it in direct conflict with GDPR.
For this reason, we recommend Quad9, a non-profit DNS service based in Switzerland. It places a strong emphasis on privacy and security, including blocking known malicious domains, and operates under strict Swiss data protection laws.
If keeping your data within EU is important,DNS4EU is another provider worth looking at.
For more advice about configuring DNS or other aspects of your business network, contact us today, or visit our homepage for more information.